Continuous Delivery: Make it work
As soon as we setup project infrastructure in a way that build and deploy is done by one batch command, we are ready to run this process continuously. It is possible to take any CI server you want, I stopped on Jenkins.. basically it contains everything I need. But before start with Jenkins, let’s one more time take a look current infrastructure and goals.
Git branching model
There is great article on that topic, I used main ideas from that. So, I have 2 branches in my origin that exists all the time. They are: master and development. All pushes I do during implementation are going to development branch. No direct pushes are made to master at all (there are some exceptions of cause, but I try to follow that rule). As soon as code in development is stabilized, I prepare special release branch (update version and small clean up there) and release is being merged to master as it tested and everything is fine.
Staging and Production environments
I define 2 types of environments: Staging and Production. Environment includes: binaries, markup, database, deploy scripts.
Everything that is being developed are goes to staging environment immediately (and automatically). Production update is being run manually as soon as all testing on Staging are finished. Separation of environments is great idea. Even if we are trying hard to have potentially shippable software during each build, this is not true. It is usually a lot of problems in latest version that need to be fixed before production server update.
So, Staging is a result of build/deploy of development; Production is a result of build/deploy of master.
In my case, everything you see here is a result of build of this. Everything you see here is a result of this.
What I want to get?
I want to have automatic system that would update my Staging with every push to development branch and I want automatic system that would update my Production as soon as master branch is ready to. As it said in overview having such system is great reduce of deployment overhead. Let’s make this happen!
As I said earlier I would use Jenkins. Great stuff about this software that is very intuitive! Setup is easy and fun, I would put just a little guidance of process.
Local Jenkins server setup
As you download Jenkins WAR file, it is easy to start just with java -jar jenkins.war. Now, the dashboard is available at http://localhost:8080/.
Plugins
First, you should add all required plugins. It already contains some, but some are missing. I’ve add such to my default configuration:
Go to “Manage Jenkins” -> “Manage Plugins” and install missing one.
So, my configuration looks like this:

Configure system
Now go to “Manage Jenkins” -> “Configure System” and find “Git” section there. You should provide with your user name and path to Git. I have git in my PATH variable (recommend you do the same).
Create new job
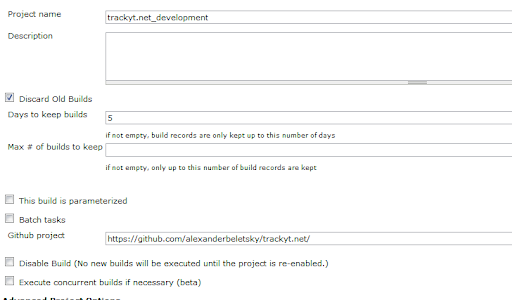
After basic configuration is done, let’s define new job. Go to “New job”. In common section you should give your job name and provide with githib path to repository.

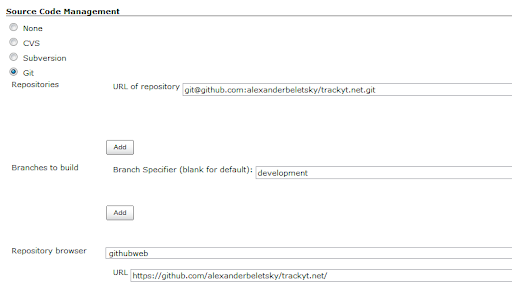
In Source Control Management: URL to Git repository, Branch to build and Repository browser (optional).

Build triggers (explain a bit later).

In Build section you specify commands to build/test/package and to deploy results. See my previous post for details.

Finally in Post-build section, specify path to grab artifacts.
Test it locally
As soon as configuration is done, you can test your build locally. Just start your job and make sure that: build run, tests executed, new database deployed, new application deployed. Basically if everything done correctly in previous steps you should not experience any troubles. If it is fine that means the configuration is simply ready to be put to production server.
Move it to production
As it defined, our goal is to update staging and production with out any manual work. The simplest scenario then CI server resides on the same machine as production server.
Great thing about Jenkins is that it requires no installation. So, I packed all content of ~/User/Jenkins folder and Git into one single package and FTP’ed to my production server. As you unpack, configure Git in PATH variable, setup up your private repository keys it is just simply ready to work. Now, test it remotely - staging and production should be able to update with one single click on Jenkins dashboard.
Little adjustments for production server
My VPS has Windows auto-update enabled, so It is being rebooted from time to time. As it is being rebooted, you should start Jenkins manually. Fortunately it has really nice feature - Jenkins might be run as Windows Service. This is extremely useful, I recommend to do it from very beginning.
Using Github hook to automate build run
I want my every commit to development to be tested and to be visible on Stage. As it said in Configure system part, you can setup build triggers. With build trigger you can run build just by requesting this URL http://jenkins.server/jobname/build?token=TOKEN.
In github repository go to Admin section and setup new hook in “Post Recieve URLs” section, like this:

This concludes the setup.
Control your builds all the time
What we did is only very basic setup, but it already gives a lot of power. It is really easy to track all builds/artifacts/history of changes. Downtime of site is extreamly slow (comparing to manual changes). Dashboard is very convenient to control builds:

As soon as we setup project infrastructure in a way that build and deploy is done by one batch command, we are ready to run this process continuously. It is possible to take any CI server you want, I stopped on Jenkins.. basically it contains everything I need. But before start with Jenkins, let’s one more time take a look current infrastructure and goals.
Git branching model
There is great article on that topic, I used main ideas from that. So, I have 2 branches in my origin that exists all the time. They are: master and development. All pushes I do during implementation are going to development branch. No direct pushes are made to master at all (there are some exceptions of cause, but I try to follow that rule). As soon as code in development is stabilized, I prepare special release branch (update version and small clean up there) and release is being merged to master as it tested and everything is fine.
Staging and Production environments
I define 2 types of environments: Staging and Production. Environment includes: binaries, markup, database, deploy scripts.
Everything that is being developed are goes to staging environment immediately (and automatically). Production update is being run manually as soon as all testing on Staging are finished. Separation of environments is great idea. Even if we are trying hard to have potentially shippable software during each build, this is not true. It is usually a lot of problems in latest version that need to be fixed before production server update.
So, Staging is a result of build/deploy of development; Production is a result of build/deploy of master.
In my case, everything you see here is a result of build of this. Everything you see here is a result of this.
What I want to get?
I want to have automatic system that would update my Staging with every push to development branch and I want automatic system that would update my Production as soon as master branch is ready to. As it said in overview having such system is great reduce of deployment overhead. Let’s make this happen!
As I said earlier I would use Jenkins. Great stuff about this software that is very intuitive! Setup is easy and fun, I would put just a little guidance of process.
Local Jenkins server setup
As you download Jenkins WAR file, it is easy to start just with java -jar jenkins.war. Now, the dashboard is available at http://localhost:8080/.
Plugins
First, you should add all required plugins. It already contains some, but some are missing. I’ve add such to my default configuration:
Go to “Manage Jenkins” -> “Manage Plugins” and install missing one.
So, my configuration looks like this:

Configure system
Now go to “Manage Jenkins” -> “Configure System” and find “Git” section there. You should provide with your user name and path to Git. I have git in my PATH variable (recommend you do the same).
Create new job
After basic configuration is done, let’s define new job. Go to “New job”. In common section you should give your job name and provide with githib path to repository.

In Source Control Management: URL to Git repository, Branch to build and Repository browser (optional).

Build triggers (explain a bit later).

In Build section you specify commands to build/test/package and to deploy results. See my previous post for details.

Finally in Post-build section, specify path to grab artifacts.
Test it locally
As soon as configuration is done, you can test your build locally. Just start your job and make sure that: build run, tests executed, new database deployed, new application deployed. Basically if everything done correctly in previous steps you should not experience any troubles. If it is fine that means the configuration is simply ready to be put to production server.
Move it to production
As it defined, our goal is to update staging and production with out any manual work. The simplest scenario then CI server resides on the same machine as production server.
Great thing about Jenkins is that it requires no installation. So, I packed all content of ~/User/Jenkins folder and Git into one single package and FTP’ed to my production server. As you unpack, configure Git in PATH variable, setup up your private repository keys it is just simply ready to work. Now, test it remotely - staging and production should be able to update with one single click on Jenkins dashboard.
Little adjustments for production server
My VPS has Windows auto-update enabled, so It is being rebooted from time to time. As it is being rebooted, you should start Jenkins manually. Fortunately it has really nice feature - Jenkins might be run as Windows Service. This is extremely useful, I recommend to do it from very beginning.
Using Github hook to automate build run
I want my every commit to development to be tested and to be visible on Stage. As it said in Configure system part, you can setup build triggers. With build trigger you can run build just by requesting this URL http://jenkins.server/jobname/build?token=TOKEN.
In github repository go to Admin section and setup new hook in “Post Recieve URLs” section, like this:

This concludes the setup.
Control your builds all the time
What we did is only very basic setup, but it already gives a lot of power. It is really easy to track all builds/artifacts/history of changes. Downtime of site is extreamly slow (comparing to manual changes). Dashboard is very convenient to control builds:
